Sunday 16 January 2011

How to speed up Windows Vista with Readyboost using memory card or flash drive

I have three machines running Windows Vista, over time, applications are installed and things start to slow down.

Whilst looking around on the internet, I found some articles about using Readyboost to speed up a Vista PC, using Flash memory such as USB Drive or memory cards, SD, SDHC, Compact Flash, Memory Stick etc

All my machines have 2GB RAM, and recommended size for Readyboost is 2-4GB. Readyboost works by caching frequently used smaller files, which are quicker to read from the flash memory because the computer finds these files very quickly with this type of memory. Larger files are accessed from hard drive which is quicker for larger files. Also there is another speed advantage because hard drive and flash memory can be read at the same time.


My initial trial was with a Fujifilm 2GB memory card, I was so impressed with the result, I decided to order larger/faster cards. I decided on Lexar SDHC 4GB 100x cards because price was good for quite high performance.

Memory cards need to have a minimum performance of above 2MB/s to work with Readyboost, my Fujifilm is around 3.5MB/s and the Lexar Cards are around 10MB/s. Some of the more expensive memory cards offer speeds around 30MB/s or more (Sandisk Extreme), but I didn't really feel that it was worth spending the extra. Different cards are distiguished either by Class 2, 4, 6, or 10 roughly by Class 2 = 2MB/s, Class 4 = 4MB/s and so on (My Fujifilm card is probably Class 4 and my Lexar card is probably Class 10). There is also a "x" rating eg 100x, 133x, 200x (My Lexar card is 100x and a Sandisk Extreme is 200x, 30MB/s. Also be aware that read speeds are generally faster than write speeds.

To test memory card or flash drive (or hard drive) performance, I found two free utilities ATTO Disk Benchmark, which can be downloaded here without filling in a form !

I also found another utility that didn't work so well for testing drive speed, Bart's Stuff Test

So if you've read through that you should have a good idea what the considerations are. To setup Readyboost on your system you'll need to :

1. Attach blank formatted memory card (or flash drive) to your PC.

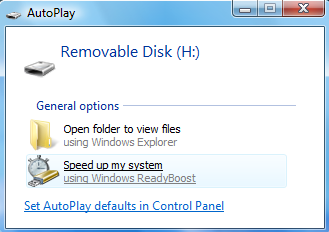
2. If you get the following window then click on Speed up my system

3. If you didn't get the previous window, then go to Start button, select Computer, find the drive relating to your memory card, right click on the drive, select Properties, and then select the Readyboost tab

3. Click Use this device, and then select the amount of space you want to use on the disk. Personally I would recommend using the whole disk if your setup is similar to mine ie 2GB RAM, 4GB SDHC card, then readyboost takes up the entire SDHC card.

Conclusion

Readyboost I found easy to use, cheap, and the increase in performance has been noticable. I often have many windows open, and the computer often struggles. With my 4GB Lexar 100x cards running Readyboost on two of my Vista PCs, things happen quicker, which mean less time staring at the screen waiting, ie very good in my book.


Resources

FAQ/Article on Readyboost

Memory cards at Amazon :


How to create par2 files recursively in a batch

I like to protect my movie files on hard drive by creating par2 files. Par2 files protect my files in case they get damaged and can be used as a way to ensure their integrity.

Because par2cmdline didn't work on my system, I decided to use Multipar command line tool par2j download here

I often have many movie files in many directories,creating the par files is time consuming and hard work. This could be done in a batch and just leave it running.

c:\video
...........c:\video\movie_directory_1
.....................movie_file_1.mkv
.....................info_file_1.nfo
...........c:\video\movie_directory_2
.....................movie_file_2.mkv
.....................info_file_2.nfo
... and so on

I also wanted to make the batch low priority, so it would be possible to do other things on the PC at the same time.

1. So first you need to install Multipar. Basically just download the latest version and extract to a directory called c:\Multipar

2. Create another directory called c:\Scripts

3. Create a file called c:\Scripts\par2batch.cmd code :


@ECHO OFF

REM this command script requires Windows 2000/XP

SETLOCAL

REM check input path

IF NOT EXIST "%1" (
ECHO The path does not exist.
GOTO :EOF
)

REM set options for PAR2 client

SET par2_path=c:\Multipar\par2j.exe
rem SET par2_blocks=800
SET par2_redundancy=10

REM recursive search of sub folders

PUSHD %1
FOR /D /R %%G IN (*.*) DO CALL :ProcessFolder "%%G" "%%~NG"
POPD

PAUSE
GOTO :EOF

REM create PAR2 files in each sub folders

:ProcessFolder
PUSHD %1
%par2_path% c -rr%par2_redundancy% -fo -rd2 -lr100 "%~2.par2" *
POPD

GOTO :EOF

ENDLOCAL


4. Next create a file called c:\Scripts\par2batchlow.cmd code:

@echo off
start /low /b parbatch.cmd %1


5. Add the paths c:\Multipar and c:\Scripts to your windows path, in Vista, Start Button, right click Computer, select Properties, select Advanced System Settings, then on the System Properties Window, press the Environment Variables Button, select the "path" environment variable, click Edit


(NB System Properties is also accessible via control panel as "System")

6. Now you can open a Command Prompt window (in Start Menu under accessories).

par2batchlow c:\directoryname

This will create par2 files in each of the subdirectories for all files that are in each sub directory.

The code presented here is modified from code that I found at the QuickPar forum , by the author of MultiPar Yutaka Sawada

I generally have used QuickPar for a number of years (download here), which is an amazing tool. However the par2 command line version I could get to work with large files, and many of the files that I'm working with are 4GB, 8GB and even 16GB for video files, so I decided to use par2j which is newer and currently being worked on.


Hope this is useful for someone, good luck